Migrating a WordPress Website to CodeRed Cloud#
Before beginning, follow the pre-migration checklist.
Migrating from one host to another can sometimes be a tedious process — remember, CodeRed provides free migrations to all customers regardless of plan. If you’d like us to handle your migration for you, contact our support.
Step 1: Download your current WordPress site files#
There are several different ways to get a copy of your WordPress site files, which vary by hosting platform.
Method A: Obtain files via a backup#
Some hosting providers, such as WP Engine, Kinsta, or GoDaddy take periodic backups of your site.
For WP Engine, you can download a backup from WP Engine.
For Kinsta, you can download a backup from Kinsta.
For WordPress.com you can download a backup from Jetpack
For GoDaddy (Managed WordPress only - not shared hosting) you can download a backup from GoDaddy. Choose “Download all”.
Other hosting providers might also offer a download option. If you are unsure, contact your provider, or follow the FTP method below.
Method B: Obtain files via FTP#
The most universal (although slowest) way of getting a copy of your files is using FTP. Your hosting provider should be able to provide you with FTP or SFTP access. Follow our FTP Guide for instructions on how to set up your FTP client. Use the credentials and connection settings provided by your hosting company.
Once connected to your server via FTP, you should see a folder containing a file
named wp-config.php. This folder is the main WordPress folder. Copy
everything from this folder onto your computer using FTP. Some hosting providers
put the WordPress folder inside of a folder named public_html, www, or
wordpress.
Depending on the size of the website, it may take several hours to finish downloading all files via FTP.
Step 2: Copy code and files to CodeRed#
Using SFTP, connect to your destination website on CodeRed Cloud and copy
the WordPress into the /www/ folder on the server.
During the copy, copy all files except wp-config.php. CodeRed already
provides that file with all of the correct configuration set.
Refer to our SFTP Guide for instructions on how to copy files using SFTP.
Depending on the size of the website, it may take several hours to finish uploading all files via SFTP.
Step 3: Obtain a database dump#
If you downloaded a backup during Step 1, then your backup already included a
file ending with .sql. If you have a .sql file, then you can skip this
step.
If you do not have a .sql file, then you can obtain one in a couple
different ways.
Method A: Obtain a SQL dump from phpMyAdmin#
If your hosting provider offers CPanel or Plesk, login and locate the section named phpMyAdmin.
In phpMyAdmin, select your database from the left side menu. If you are unsure
of what your database is named, open the wp-config.php file you obtained in
Step 1, using a program such as Notepad. Look for a section in the
wp-config.php file that looks like the following:
define('DB_NAME', 'database_name_here');
Whatever is in place of database_name_here is your database name.
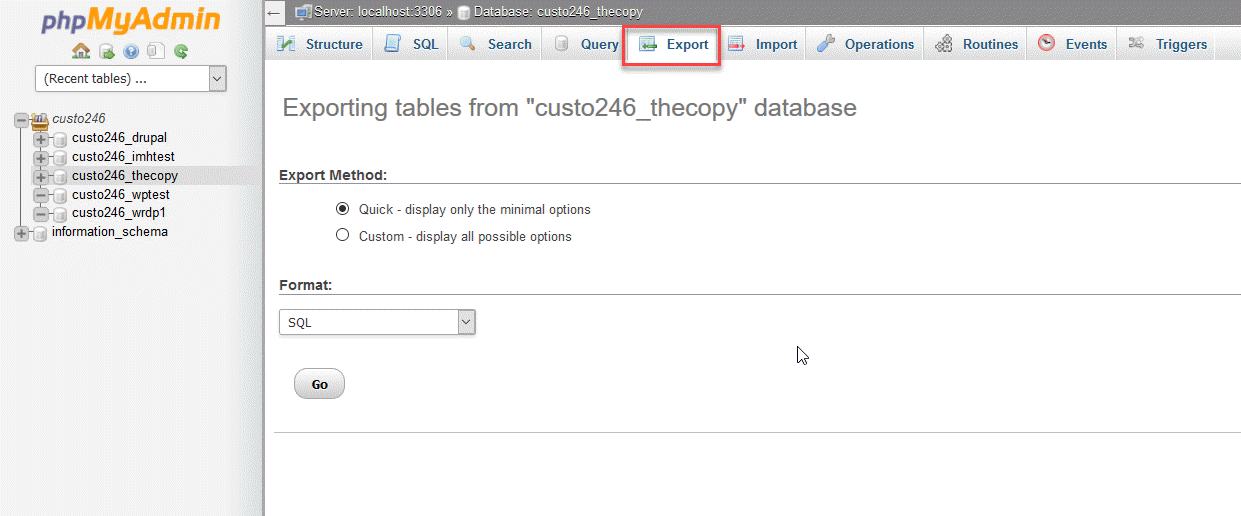
Once you have selected the database in the left side menu, click Export
in the top menu. Select Quick for method, and SQL for format, then click
Go. This will download a copy of your database as a .sql file.
Method B: Obtain a SQL dump using MySQL#
For this you will require database connection credentials for your current
web host, and either the mysql/mysqldump command line tools.
With the connection info, run the following commands to produce a text-based SQL dump of your database that is compatible with CodeRed’s database service.
% mysqldump -h <host> -u <user> -p --hex-blob --result-file datadump.sql <database_name>
PS> mysqldump -h <host> -u <user> -p --hex-blob --result-file datadump.sql <database_name>
$ mysqldump -h <host> -u <user> -p --hex-blob --result-file datadump.sql <database_name>
This will output a file in the current directory named datadump.sql. This
file is probably very large as it contains your entire database contents.
Step 4: Reset your CodeRed database#
Before loading in your existing database, your CodeRed database must first be wiped clean to start in an empty state.
Reset your website’s database by clicking the Database tab > Reset Production Database in the CodeRed dashboard.
Warning
This will totally destroy your entire database hosted on CodeRed and all data in it. Normally this is fine if you have not yet migrated your live site to CodeRed, but if you have any important data, be sure to back it up first.
Step 5: Import database dump to CodeRed#
Next you will load your .sql file into your destination website.
Follow our Connect to Your CodeRed Database guide to connect to your CodeRed database.
Now, open the Terminal (macOS, Linux) or PowerShell (Windows) and run the following command:
% cat datadump.sql | mysql -p --user <user> --host <host> <database_name>
PS> Get-Content datadump.sql | mysql -p --user <user> --host <host> <database_name>
$ cat datadump.sql | mysql -p --user <user> --host <host> <database_name>
If you encounter any errors or have trouble loading the database dump, contact CodeRed support for assistance.
Note
MySQL on CodeRed only supports InnoDB engine. You may need to find/replace
ENGINE=... with ENGINE=InnoDB in your SQL dump file before loading it
into CodeRed. Older versions of MySQL/MariaDB used to default to
ENGINE=MyISAM.
Step 6: Deploy#
Now that your code and database have both been loaded into the server, deploy the website from the CodeRed dashboard. This deploy action will create a fresh WordPress environment using the files and database you just loaded.
On the CodeRed dashboard, click Deployment tab > Deploy Production. This process might take a few minutes the first time, however you will receive an email when the deployment is complete.
Step 7: Replace domain#
Every time you upload media or post a new page, WordPress stores the full URL, including the domain. This means that when moving a WordPress site from one host to another, the domain of the old host needs to be replaced with the domain of the new host.
To fix this, contact CodeRed support for assistance.
At this point, you may need to test and evaluate your website, to make sure the
migration did not produce any errors. Common errors might be a result of a bad
data dump/import, or a problem with the wp-config.php file.
Repeat the steps above to resolve any errors as necessary. Once you’re ready to “flip the switch” and fully move your live website over to CodeRed, proceed to the step below.
Step 8: DNS Update#
The final step is to make a DNS update to point your custom domain to your new
CodeRed website. First ensure your website is running correctly and without
errors at http://<mysite>.codered.cloud/. If your site is running as
expected, follow our Use a Custom Domain Name guide to connect your domain.